How to upgrade your PC to a Solid State Drive
 The most effective way you can enhance the performance of your PC is to replace its existing hard disk with a Solid State Drive (SSD). Many of the articles covering this subject make the process sound fairly daunting, however the more recent devices around come with utilities that make it much easier. With 250GB SSDs now available for less than £100, it is well worth doing.
You can choose to reinstall Windows and all your applications on to your new SSD from scratch, but for most it makes more sense to ‘clone’ the contents of your existing hard disk, which has the advantage of maintaining your existing working environment. The process does take time but, provided your machine is not more than five or six years old, need not be as daunting as much of the available advice suggests. The following relates to the installation of a Samsung 850 EVO 2.5-inch 250GB SSD into a Dell Vostro 430 running Windows 7. It also assumes that the connection to your existing drive is either SATA II or SATA III (if in doubt, check the specification or open up the case and check the connections).
- Samsung require you to plug the SSD into a USB port when it comes to the actual cloning process, but don’t provide you with the means to do so. Neither do they provide you with the hardware to actually mount your 2.5-inch SSD into the space occupied by your existing hard disk. You therefore need to purchase these separately. For the cable, you want something with a SATA II or III socket at one end, and a USB connector at the other. I used a PNY SSD Accessories Kit from PC World, which includes the cable and the mounting kit for £9.99.
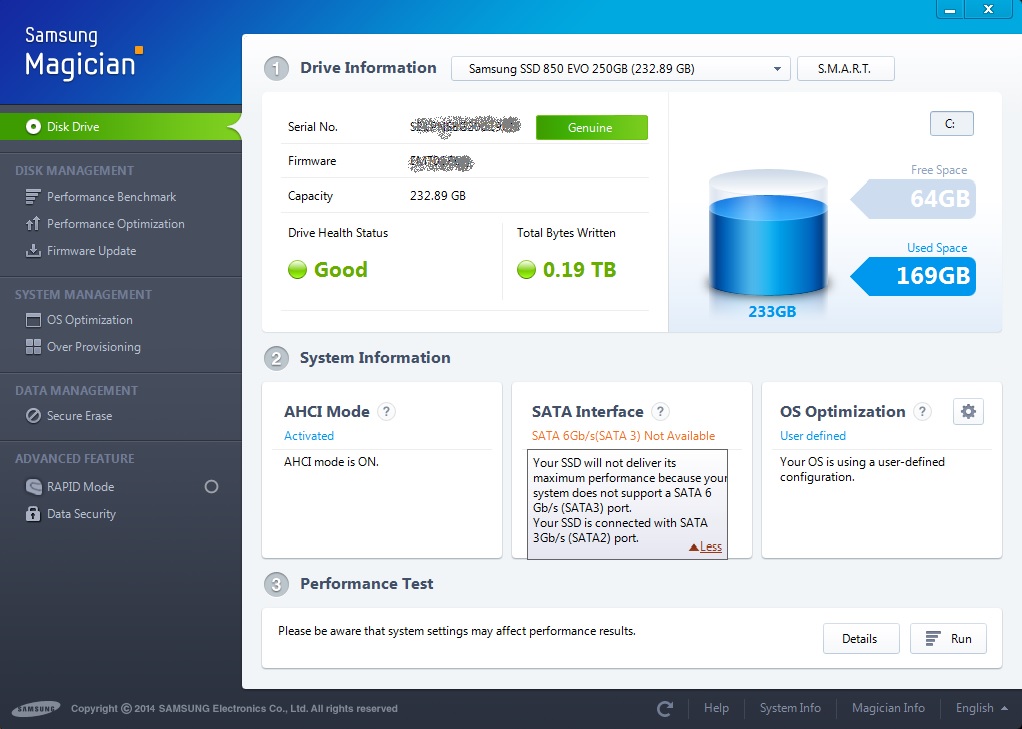
- The first step is to install the two programs that come on the CD that accompanies the SSD, namely Samsung Data Migration and Samsung Magician. These are the secret to your success.
- If you haven’t done so already, find a blank CD or DVD and create a System Repair Disk using the utility that you will find in the Backup and Restore section of the Control Panel.
- Cloning takes time, and the chances are that your SSD has a lower capacity than your hard disk, so it makes sense to get rid of the files that you don’t need before you start cloning. My machine had a 512GB hard disk installed, of which some 290GB was taken up with software and data. It’s a good idea to leave at least 20% of your SSD unoccupied after the clone, which in my case meant getting rid of some 90GB so as to leave around 200GB for transfer. Start by uninstalling those applications you never use, and deleting the associated folders from C:\Program Files or the C:\Program Files (x86). You can do this using the uninstall tools that may have been installed alongside the applications, or from Programs and Features which you can access from the Control Panel.
- It makes sense to make sure you have copies of documents, music, pictures, video files and any other important data on an external or networked hard disk. In the process you can delete files you don’t need, and move rather than copy files that are only of archival value.
- Make sure your system is up to date by running the Windows Update tool from the Start menu.
- It’s now time to get rid of all those files that hide out in the Recycle Bin, the Temporary Internet files folder and other such arcane corners. Some people advise sophisticated third-party tools for this, but I feel safer using Windows’ own Disk Cleanup utility, which you will find in the Start menu under Accessories/System Tools. Run this first as it comes, and then select the ‘Clean up system files’ button. This can easily reclaim 5GB of space.
- Once done it’s a good idea to Restart your computer to make sure everything is running properly. Some people advise running a defragmenter tool on your existing hard disk before cloning. This may reduce the time it takes to clone, but defragmenting will itself take several hours, and makes no difference to the way files are stored on the SSD, so I didn’t bother.
- You are now ready to start cloning. Plug the SSD into one of the USB ports on your computer, and run Samsung Data Migration. Don’t be alarmed if at first it reports a duration of 8 or 9 hours as data transfer speeds up through the cloning process, and in practice it took around 3.5 hours to clone a little under 200GB.
- You now need to physically install the SSD. Turn off the computer, but leave the mains cable connected so as to earth the chassis. Open up the case, carefully remove the two SATA cables connecting the hard disk to the motherboard, and then remove the hard disk. Mount the SSD using the screws and the mounting kit provided, and then plug in the SATA cables. (In my case the hard disk was not mounted within a drive tray but bolted directly to the chassis, so you may have to improvise.)
- Now the moment of truth. Turn the computer back on and it should boot up into Windows much like normal, but considerably faster. If it doesn’t then boot up from the System Repair Disk that you made earlier, and use the various tools provided to find out what’s wrong. This will repair problems such as the BIOS not recognising the SSD as a valid boot disk.
- Assuming it has worked, you now have a working system. However, Windows still thinks you have a traditional hard disk. This is where Samsung Magician comes in, automatically changing settings in order to take full advantage of the SSD. In practice this involves balancing performance with reliability. SSDs ‘wear out’ after performing a large number of read/write operations, so it makes sense to minimise the number of operations carried out. Samsung Magician comes with preset options balancing high performance with high reliability, but I would suggest the following settings:
a. Disable Hibernation mode as this involves copying the contents of memory to the SSD, and makes little sense on a desktop.
b. Deactivate File Indexing. On a conventional disk File Indexing does speed up disk access by creating a separate index to help the operating system find files quickly, however it does involve extra read/writes and the SSD will access files quite fast enough without it.
c. Deactivate Prefetch, which is another trick used to speed up conventional hard disks.
d. Enable Write Cache Buffer but deactivate Write Cache Buffer Flushing.
e. Disable Automatic Backup as this involves superfluous read/writes.
f. Make sure the Windows Disk Defragmenter is switched off, as defragmenting an SSD makes no sense. - Reboot and make sure everything is working. One final trick is to enable the RAPID mode offered by Samsung Magician, which speeds SSD access even further.


No mention of switching to AHCI mode in your article (which I found to be very useful). Please see how to enable ACHI after install of SSD here: https://www.tenforums.com/drivers-hardware/15006-attn-ssd-owners-enabling-ahci-mode-after-windows-10-installation.html
LikeLike
Thanks Ryan! Samsung doesn’t make any mention of ACHI, and the drive has been working well over the last 20 or so months, so I haven’t tried it. That said, I am wondering how NCQ can help an SSD, as there is no drive head movement to optimise? Might be different if I had a conventional drive installed as well, but all I have is the single SSD. See http://superuser.com/questions/466254/should-ahci-be-enabled-for-an-ssd for more on this.
LikeLike
That said, I’ve just run the Samsung Magician program which reports that in my case ACHI mode is ON. Interesting 🙂
LikeLike
One final thing: I have disabled RAPID mode as there are indications that, while it may improve speeds under test conditions, it actually hinders ‘real life’ performance. See http://superuser.com/questions/742765/is-it-beneficial-to-enable-rapid-mode-on-a-samsung-solid-state-drive#742768 for more information.
LikeLike